Sending Emails (Composer)
Beautiful Markdown Composer with Live-Preview in Neovim
Since you compose every email in Neovim as a neomd-*.md buffer, a small markdown plugin setup makes the writing experience much nicer — headings get colored blocks, code fences get borders, bullets get spacing, and callouts (> [!note]) render with icons live as you type.
Workflow of Writing and Composing an Email
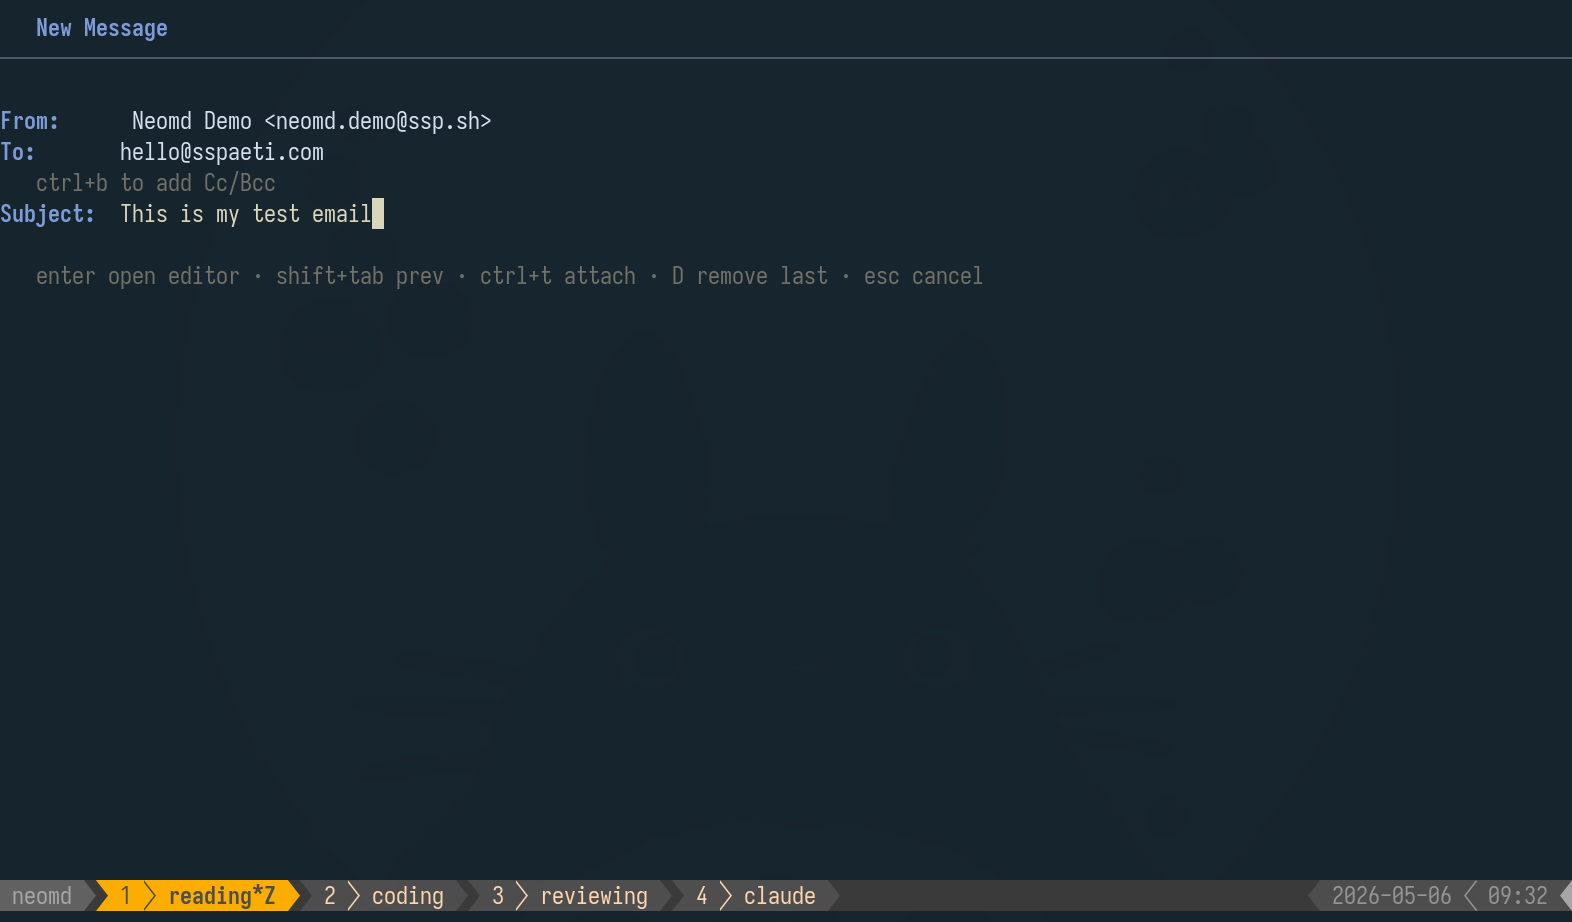
Pre-Composer: Fill in your emails and subject:
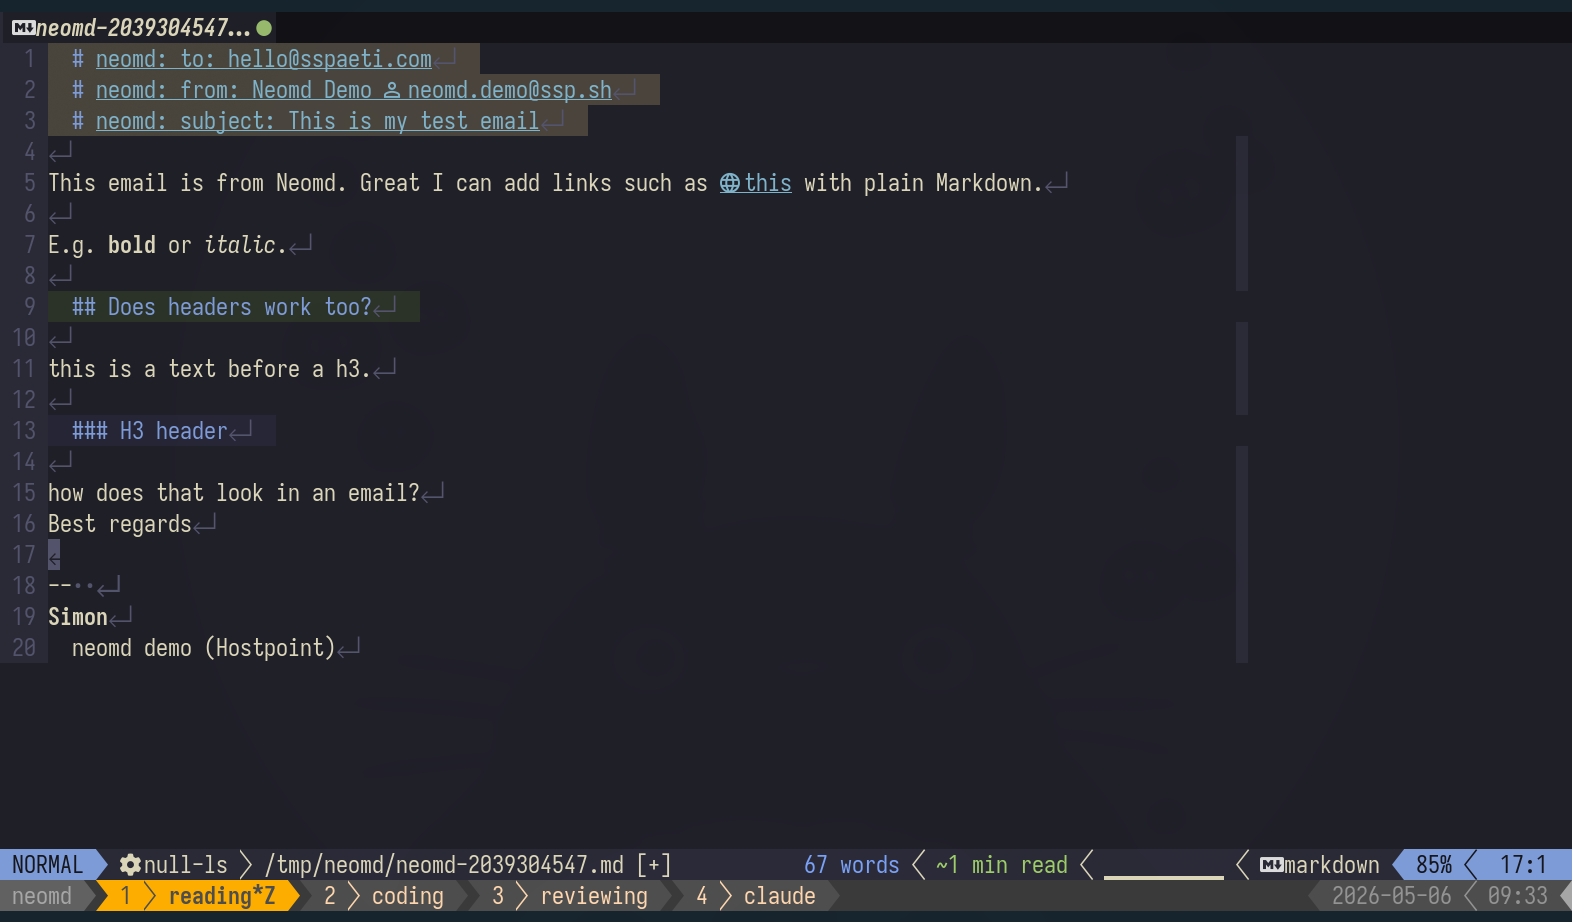
Composer: Write your email in Neovim with Markdown rendering enabled (see configs below):
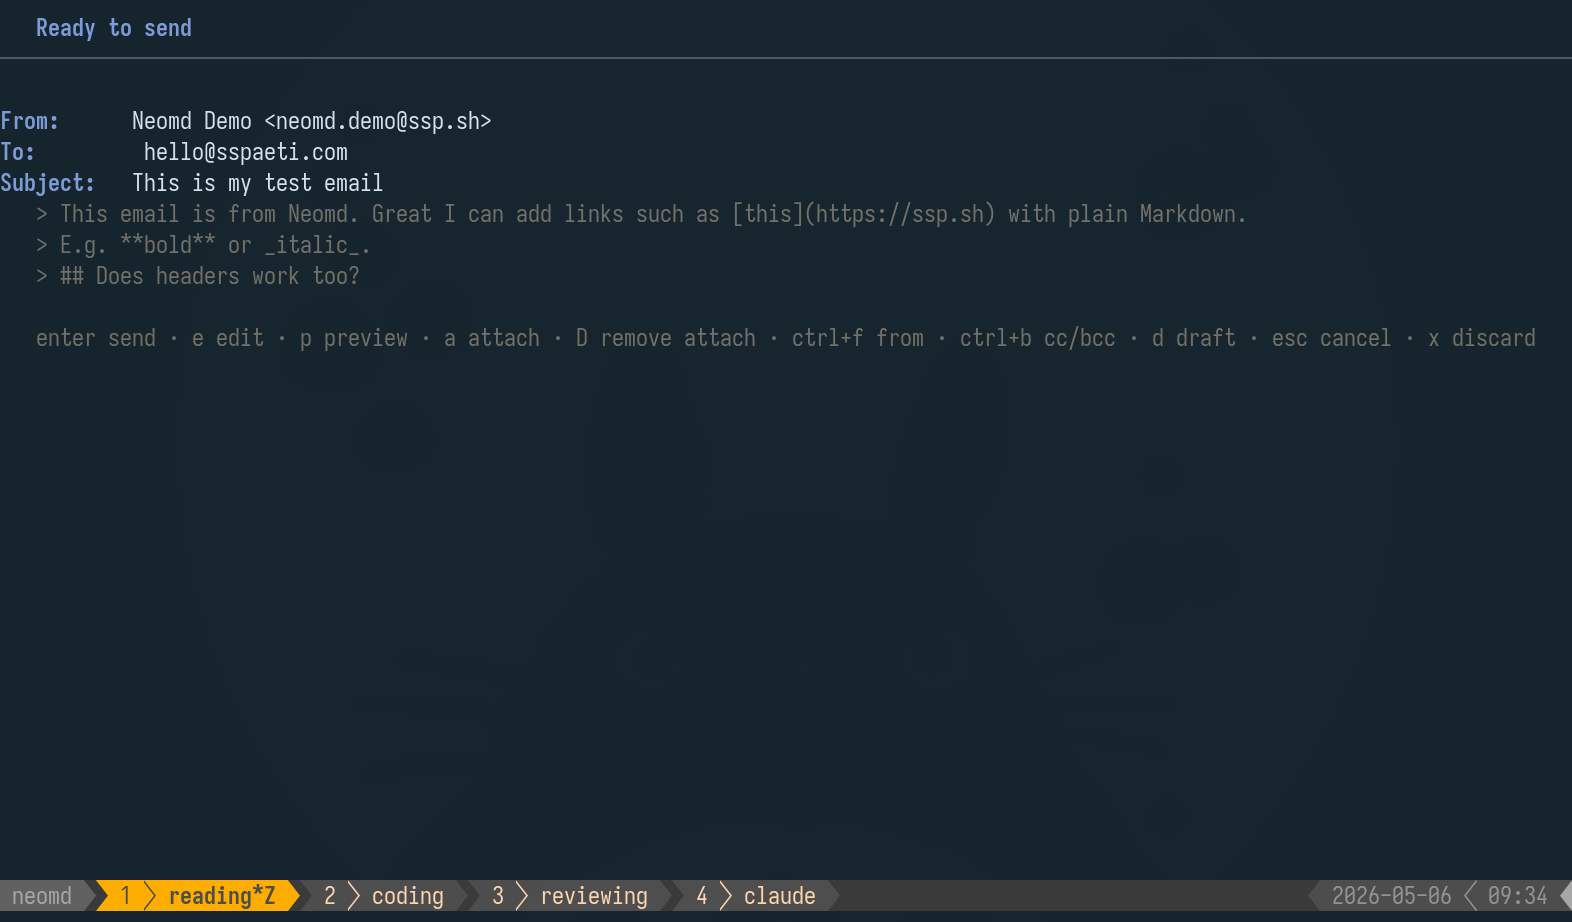
Post-Composer and Pre-Sent View: Preview, change FROM sender, attach files, etc.:
Preview in Browser: Preview email in Browser - shows emails, Markdown rendered HTML.

Optional Neovim Configuratios
Recommended for nice look and live rendering while you compose your emails
The single plugin that does most of the work is render-markdown.nvim. Drop this file into your lazy.nvim plugin folder (e.g. ~/.config/nvim/lua/plugins/markdown.lua):
return {
  -- Live inline rendering: headings, code blocks, bullets, callouts
  {
    "MeanderingProgrammer/render-markdown.nvim",
    ft = { "markdown" },
    dependencies = { "nvim-treesitter/nvim-treesitter", "nvim-tree/nvim-web-devicons" },
    keys = {
      { "<leader>mr", ":RenderMarkdown toggle<CR>", desc = "Markdown render toggle" },
    },
    opts = {
      heading = {
        sign = false,
        position = "inline",
        icons = { "# ", "## ", "### ", "#### ", "##### ", "###### " },
        width = "block",
        left_pad = 2,
        right_pad = 4,
      },
      code = {
        sign = false,
        left_pad = 2,
        right_pad = 4,
        border = "thick",
      },
      bullet = { right_pad = 2 },
    },
  },

  -- Optional: bold / italic / link toggles via Alt-key chords in visual mode
  {
    "tadmccorkle/markdown.nvim",
    ft = "markdown",
    opts = {
      on_attach = function(bufnr)
        local toggle = function(key)
          return "<Esc>gv<Cmd>lua require'markdown.inline'"
            .. ".toggle_emphasis_visual'" .. key .. "'<CR>"
        end
        vim.keymap.set("x", "<M-i>", toggle("i"), { buffer = bufnr }) -- italic
        vim.keymap.set("x", "<M-b>", toggle("l"), { buffer = bufnr }) -- bold
        vim.keymap.set("x", "<M-k>", toggle("l"), { buffer = bufnr }) -- link
      end,
    },
  },
}
Toggle rendering on/off with <leader>mr. For the full version (with browser preview, wikilinks, custom highlights), see my live config at markdown.lua.
Multiple From Addresses
Add [[senders]] blocks to config to define extra identities that share an existing account’s SMTP credentials:
[[senders]]
name    = "Work alias"
from    = "info@example.com"
account = "Personal"   # must match the name = field of an [[accounts]] block
In compose and pre-send, press ctrl+f to cycle through all configured accounts followed by all senders. The displayed From: field updates live. Sent copies always go to the active account’s Sent folder regardless of which From is selected.
CC, BCC, Reply-all, and Forward
In the compose form, ctrl+b toggles the Cc and Bcc fields (hidden by default). Bcc recipients receive the email but are never written to message headers. From the reader, r replies to the sender and R replies to the sender plus all Cc recipients (your own address excluded, Reply-To respected).
All replies include proper In-Reply-To and References headers for email threading, ensuring they appear in conversation threads in Gmail, Outlook, and Apple Mail.
Press f to forward an email — works from both the reader and the inbox list (the body is fetched automatically). The editor opens with the original message quoted and Fwd: prepended to the subject. Fill in the # [neomd: to: ] field and add your own text above the quoted block.
Emoji Reactions
Press ctrl+e from the inbox or reader view to react to an email with a single emoji — a fast, lightweight way to acknowledge receipt without writing a full reply.
Available reactions:
- 👍 Thumbs up
- ❤️ Love
- 😂 Laugh
- 🎉 Celebrate
- 🙏 Thanks
- 💯 Perfect
- 👀 Eyes
- ✅ Check
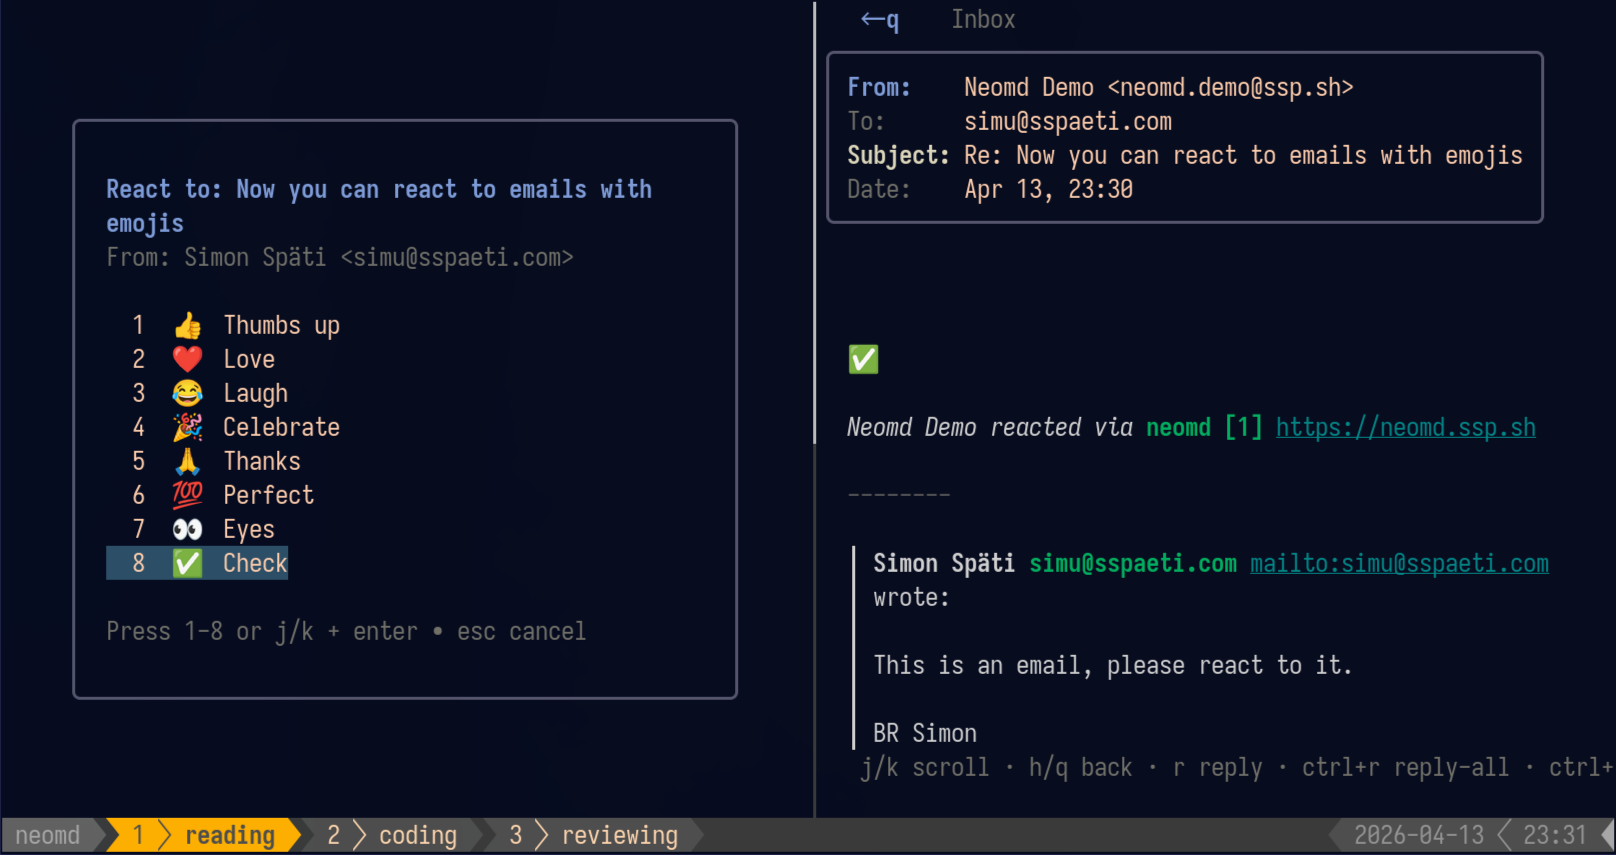
How it works:
- Press
ctrl+ewhile viewing or selecting an email - Choose an emoji by pressing
1-8(instant send) or navigate withj/kand pressenter - Press
escto cancel
The reaction is sent immediately (no editor, no pre-send review) as a properly formatted email with:
Plain text:
👍

Simon Späti reacted via [neomd](https://neomd.ssp.sh)

---

> **John Doe** wrote:
>
> original email body quoted here

---
HTML: The emoji is displayed at 48px with a styled footer containing your name and a link to neomd. The original message is quoted below in a styled blockquote.
Threading:
Reactions include proper In-Reply-To and References headers so they appear in the conversation thread (tested with Gmail, Outlook, and Apple Mail). The original email is marked with the \Answered flag.
From address: The reaction is automatically sent from the address that received the original email (same logic as regular replies). A copy is saved to your Sent folder.
Emoji reactions are perfect for quick acknowledgments, celebrating good news, or thanking someone without the overhead of composing a full reply.
Attachments
Attachments are tightly integrated with both the pre-send screen and neovim.
From the pre-send screen — press a to open yazi (auto-detected; override with $NEOMD_FILE_PICKER). Press D to remove the last attachment.
From within neovim — press <leader>a in any neomd-*.md buffer to open yazi in a floating terminal. Selected files are inserted at the cursor as visible [attach] /path/to/file lines.
Recommended: add the yazi-side selection-guard from my yazi init.lua. When yazi is launched with --chooser-file (how neomd opens it), pressing <Enter> runs yazi’s open, which writes the selected file(s) if any are selected, otherwise the hovered file (see yazi-actor/src/mgr/open.rs:23-31). A single stray <Space> press in yazi toggles selection on the file under cursor — and that selection survives a cd, so navigating to ~/Downloads via gd / Z and pressing Enter on your PDF can write the wrong path (e.g. a directory from the launch dir) to the chooser file. The snippet below clears any selection on every cd only when yazi was launched with --chooser-file, so normal interactive yazi usage is untouched:
ps.sub("cd", function()
  if rt.args.chooser_file then
    ya.emit("escape", { select = true })
  end
end)
If you skip this, neomd’s Go-side guard (filterValidAttachments) still catches the obvious failure — a directory written as the path will be rejected with a red warning on the pre-send screen instead of attached or sent.
neomd strips [attach] lines before sending:
- Image files (
.png,.jpg,.gif,.webp,.svg) → embedded inline in the HTML body; recipients see the image at that position - Other files → appended as a regular MIME attachment
Here is a screenshot:
[attach] /home/you/screenshots/overview.png

And a PDF for reference:
[attach] /home/you/docs/report.pdf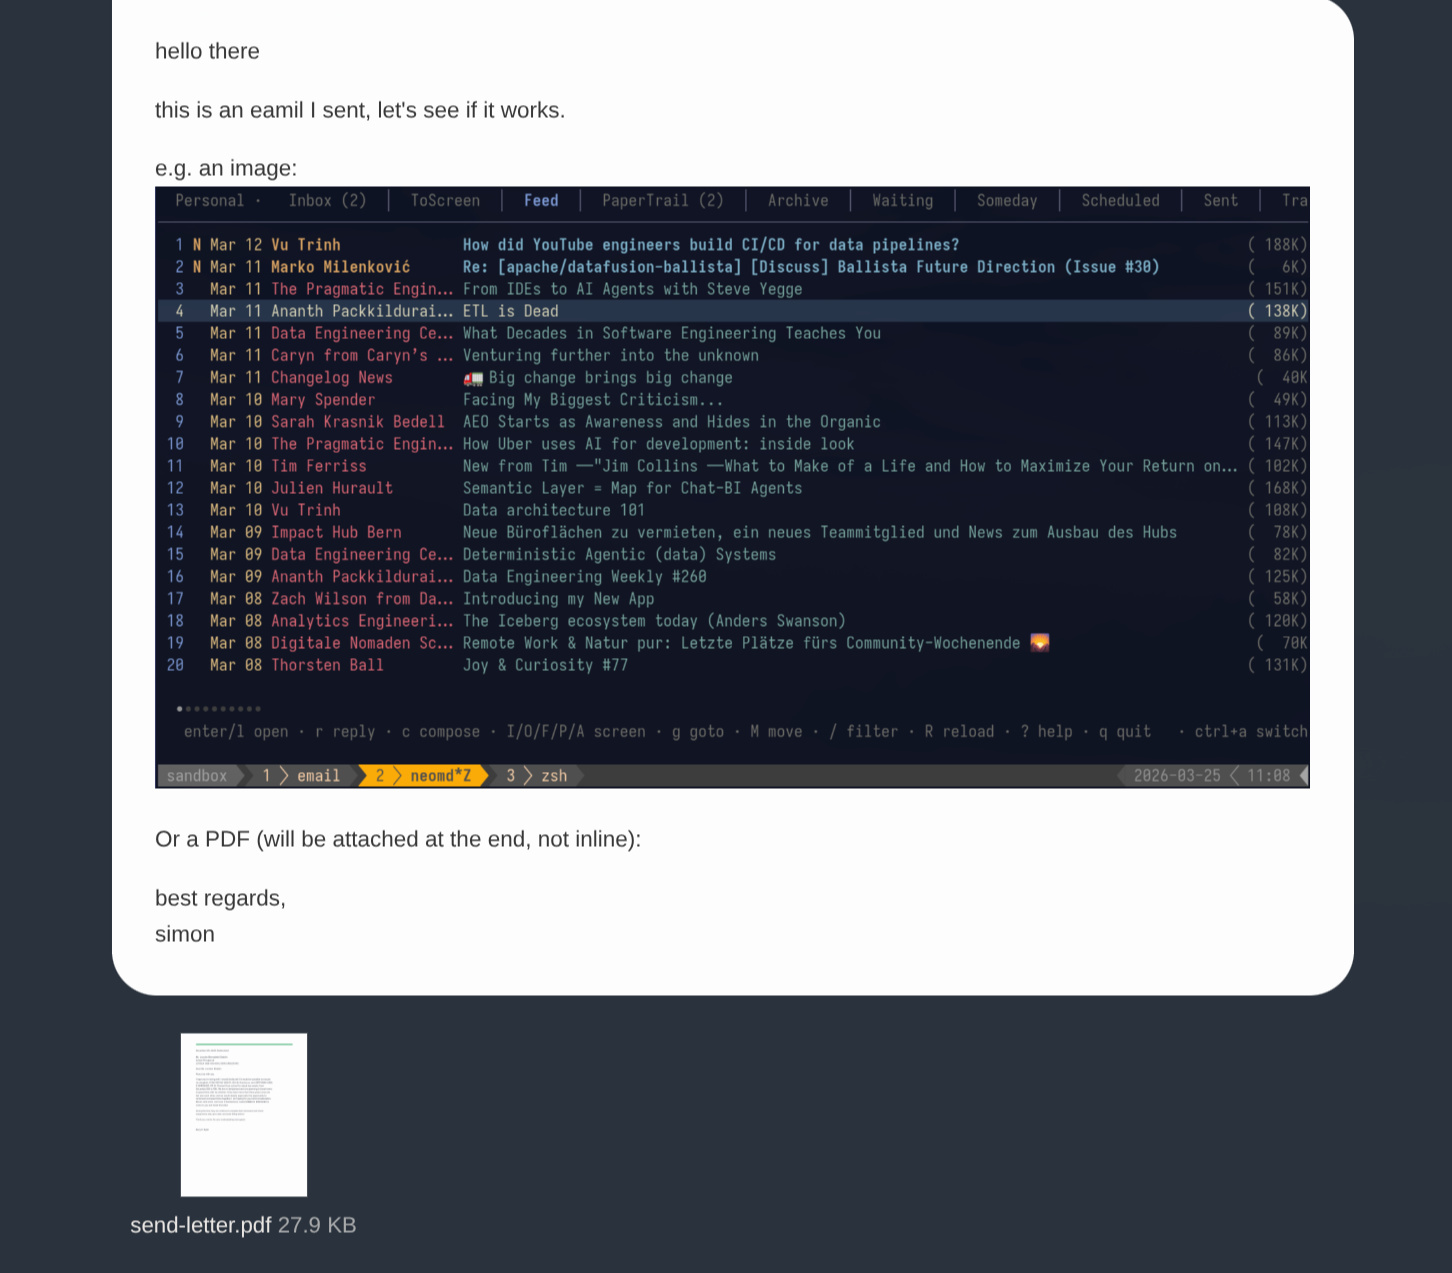
Re-opening the editor: # [attach] header form
When you bounce out of pre-send back into the editor (e to re-edit, s to spell-check, i to hand off to an AI tool), or continue a saved draft, attachments that were already tracked are re-injected at the top of the buffer — right under the other # [neomd: ...] headers — using a #-prefixed form:
# [neomd: to: hello@sspaeti.com]
# [neomd: bcc: simon.spaeti@gmail.com]
# [neomd: from: Simon Späti <simu@sspaeti.com>]
# [neomd: subject: Re: Website Banner Sponsorship]
# [attach] /home/you/docs/services-overview.pdf
# [attach] /home/you/docs/pricing.pdf

Hi Luca,
…#-prefixed form (# [attach] /path) is what neomd injects on re-open so attachments group visually with the rest of the metadata headers — your treesitter/render-markdown setup styles them as bold H1 headings, so they stand out. The plain form ([attach] /path) is what the <leader>a yazi helper inserts at the cursor, so you can still drop an image inline next to a paragraph and have it render in-place. Both are recognized; mix freely. The editor buffer is the source of truth — remove a [attach] line on save and that attachment is dropped./tmp/neomd/draft-<name>-<random>. When you continue a draft from the Drafts folder (E), neomd re-extracts the saved attachment MIME parts to /tmp/neomd/ and uses those temp paths in the re-injected # [attach] lines. This keeps the drafts loop closed even after the original local files moved or were deleted. If you’d rather attach the current version of those files, replace the temp paths with the originals before saving.Pre-send Review
After saving and closing the editor, neomd shows a review screen before sending — add or remove attachments, save to Drafts, or re-open the editor without sending accidentally.
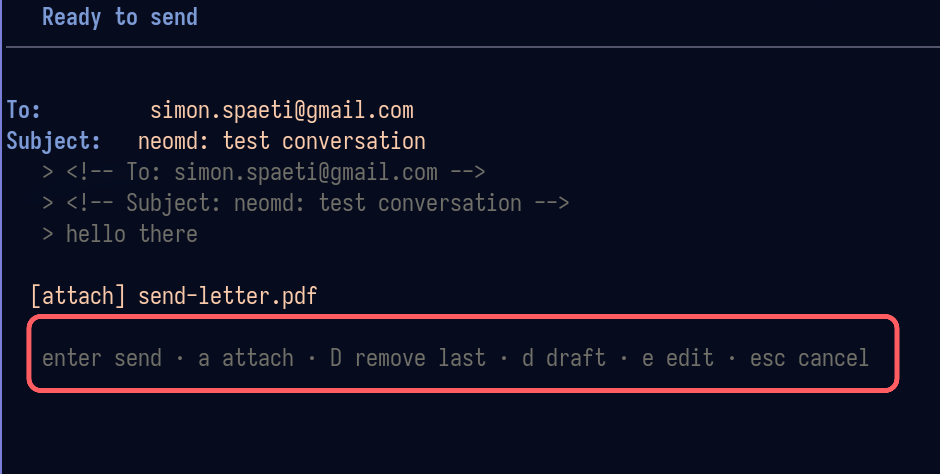
| Key | Action |
|---|---|
enter | send |
p | preview in $BROWSER — renders through the same pipeline as sending, with inline images visible |
a | attach file via yazi |
D | remove last attachment |
d | save to Drafts (IMAP APPEND with \Draft flag) |
e | re-open editor |
s | re-open editor with nvim spell-check on, cursor on first error |
i | hand off to an external AI tool (see AI Handoff below) |
esc | cancel |
Press p to see exactly what the recipient will see — the email is rendered through the same goldmark Markdown-to-HTML pipeline used for sending. Local image paths from [attach] lines are converted to file:// URLs so the browser displays them inline.
AI Handoff
Press i on the pre-send screen to hand the current draft off to an external AI CLI (claude, codex, aichat, sgpt, …). neomd will:
- Show a one-line prompt for your instruction (e.g.
fix grammar,make it more formal,tighten this). - Write the current draft to a temp markdown file with the standard
# [neomd: ...]headers. - Spawn
<command> [args...] <file>(with{prompt}and{file}placeholders substituted inargs). The spawned process’s working directory is set to the temp dir holding the draft, so e.g. claude’s built-in Edit tool can reach the file with no--add-dir. - Re-read the file on exit and replace your draft body — the same parser as the regular editor flow, so headers the AI may have rewritten (To, Cc, Bcc, Subject) are picked up automatically.
This is how it looks
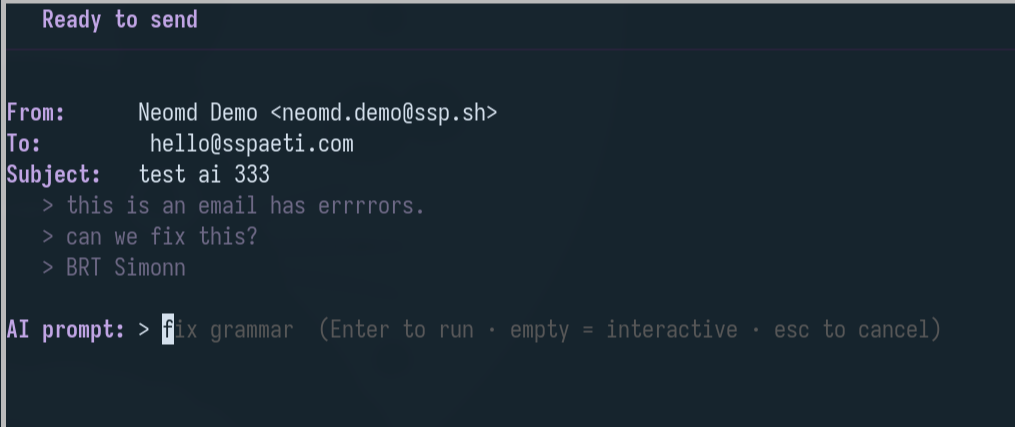
Prompt modes:
- Empty prompt + Enter — interactive mode.
{prompt}is replaced by"", so the defaultargs = ["edit {file}: {prompt}"]becomesclaude "edit neomd-ai-XYZ.md: "and you continue the conversation inside the AI tool. - Typed instruction + Enter — non-interactive:
claude "edit neomd-ai-XYZ.md: fix grammar". The tool edits the file and exits. - Esc — cancel and return to pre-send.
Quit the AI tool (ctrl+c, q, /quit, ZZ, …) to return to neomd’s pre-send screen with the edits picked up.
claude -p. The -p (print) flag in Claude Code is non-interactive and bills against your API credits rather than your Claude Pro/Max subscription — it leaks money even when you’re paying for a plan. Interactive mode runs under your subscription auth. Only switch to args = ["-p", "edit {file}: {prompt}"] if you have an API key with credits and explicitly want the scripted, no-review flow.nvim is intentionally not a useful default here — the compose buffer is already open in nvim before pre-send, so spawning nvim on i would just re-edit. You can already use avante.nvim or similar inside the composer for in-editor AI; the i handoff is for picking a different tool. Set [ai].command = "" to disable the binding entirely.
For configuration ([ai].command, [ai].args, placeholders), see Configuration → AI handoff.
Drafts
Press d in the pre-send screen to save to Drafts instead of sending. Navigate to Drafts with gd. To resume a saved draft, open it and press E — it re-opens in the editor with all fields pre-filled, and saving goes through the normal pre-send review.
Note: Drafts are stored as plain text only (not multipart/alternative) to preserve markdown formatting when reopening. This prevents formatting corruption like line break addition, pipe escaping, and italic style changes.
HTML Signatures
neomd supports dual-format signatures for professional email layouts with logos, tables, and styled text.
Configure separate text and HTML signatures in [ui.signature_block]:
[ui.signature_block]
  text = """[html-signature]"""

  html = """<table style="font-size: 14px; color: #333;">
  <tr>
    <td><img src="https://example.com/logo.png" width="80"></td>
    <td>
      <strong>Your Name</strong><br>
      Your Title, Company Name
    </td>
  </tr>
</table>"""
How it works:
- The text signature appears in the editor and in the
text/plainMIME part - The HTML signature is appended to the
text/htmlMIME part only - Recipients using HTML email clients see the styled HTML signature
- Recipients using plain text clients see the text signature
The [html-signature] placeholder:
Include [html-signature] in your text signature (as shown above) to control HTML signature inclusion on a per-email basis:
- The placeholder is visible in the editor and pre-send preview
- When you send, neomd strips the placeholder and appends the HTML signature to the HTML part
- Delete the placeholder in the editor to send without the HTML signature for that specific email
This gives you full control: professional HTML signatures by default, plain signatures when needed.
Best practices:
- Use inline styles only (no
<style>blocks) for maximum email client compatibility - Host images externally (
https://example.com/logo.png) so they display for recipients - Test your HTML signature by sending to yourself first
- The
--separator is added automatically before the text signature
For full HTML signature configuration examples, see Configuration Reference.
Per-account override: signatures can also be set per [[accounts]] entry via an [accounts.signature_block] table — useful when you sign personal mail with a Markdown blurb but business mail with a styled HTML table. Accounts without their own block fall back to [ui.signature_block]. See Per-Account Signatures for the full setup.
For reading emails — images, links, attachments, and navigation — see Reading Emails.
Callouts (Admonition)
neomd supports GitHub/Obsidian-style callouts through the this extension (with my fork) for highlighted information boxes in your emails. Use the > [!TYPE] syntax to create styled alert boxes:
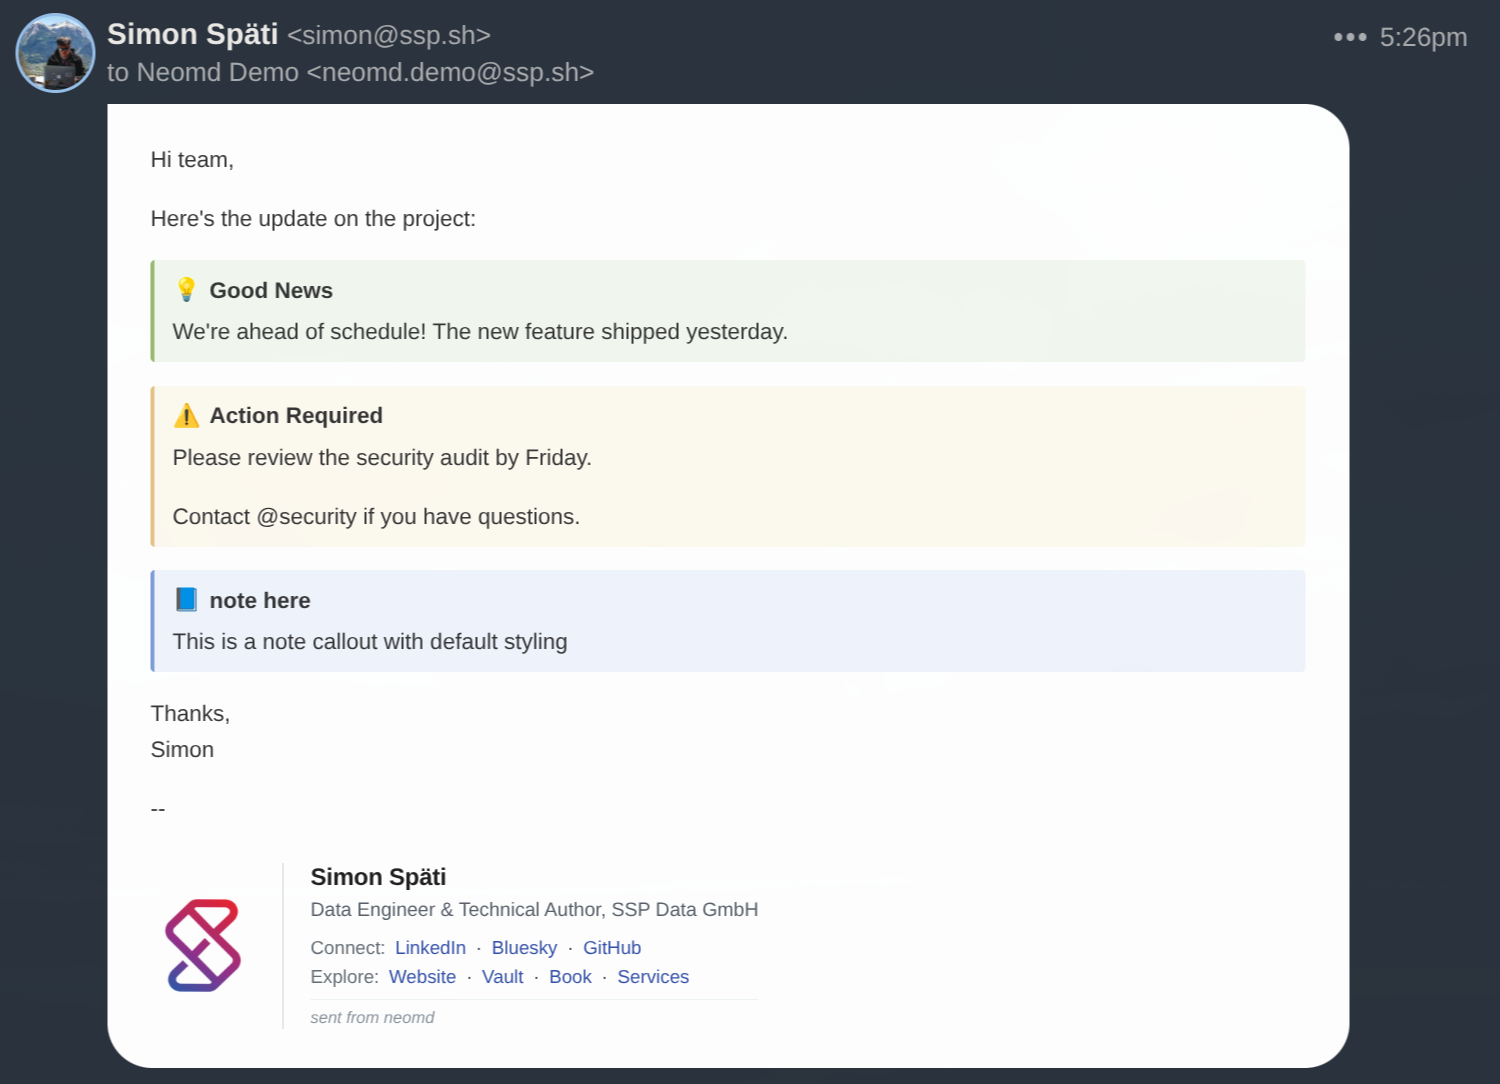
This is how it looks at the recievers end:
> [!note]
> This is a note callout with default styling

> [!tip] Pro Tip
> Use custom titles by adding text after the type

> [!warning] Important
> Callouts can have multiple paragraphs
>
> Just add blank blockquote lines between them
Available callout types:
[!note]— Blue info box[!tip]— Green success/tip box[!warning]— Yellow warning box
Features:
- Custom titles — add text after the type:
> [!warning] Security Alert - Multiple paragraphs — use
>(blockquote with space) for blank lines - Works in both syntaxes:
> [!note](with space) or>[!note](without space)
What recipients see:
HTML email clients (Gmail, Outlook, Apple Mail) display callouts as colored boxes with:
- Colored left border (4px solid)
- Colored background
- Bold title with icon
- Proper spacing and padding
Note
Plain text email clients show callouts as regular blockquotes (graceful degradation).
Example in composed email:
Hi team,

Here's the update on the project:

> [!tip] Good News
> We're ahead of schedule! The new feature shipped yesterday.

> [!warning] Action Required
> Please review the security audit by Friday.
>
> Contact @security if you have questions.

Thanks,
Simon
Format that email is sent
neomd sends every email as multipart/alternative:
text/plain— the raw Markdown you wrote (readable as-is in any client)text/html— rendered by goldmark with a clean CSS wrapper
This means recipients using Gmail, Apple Mail, Outlook, etc. see properly formatted links, bold, headers, inline code, and code blocks — while you write nothing but Markdown.
When attachments are present the MIME structure is upgraded automatically:
- Images →
multipart/relatedwithContent-ID— displayed inline in the email body - Other files (PDF, zip, …) →
multipart/mixed— shown as downloadable attachments
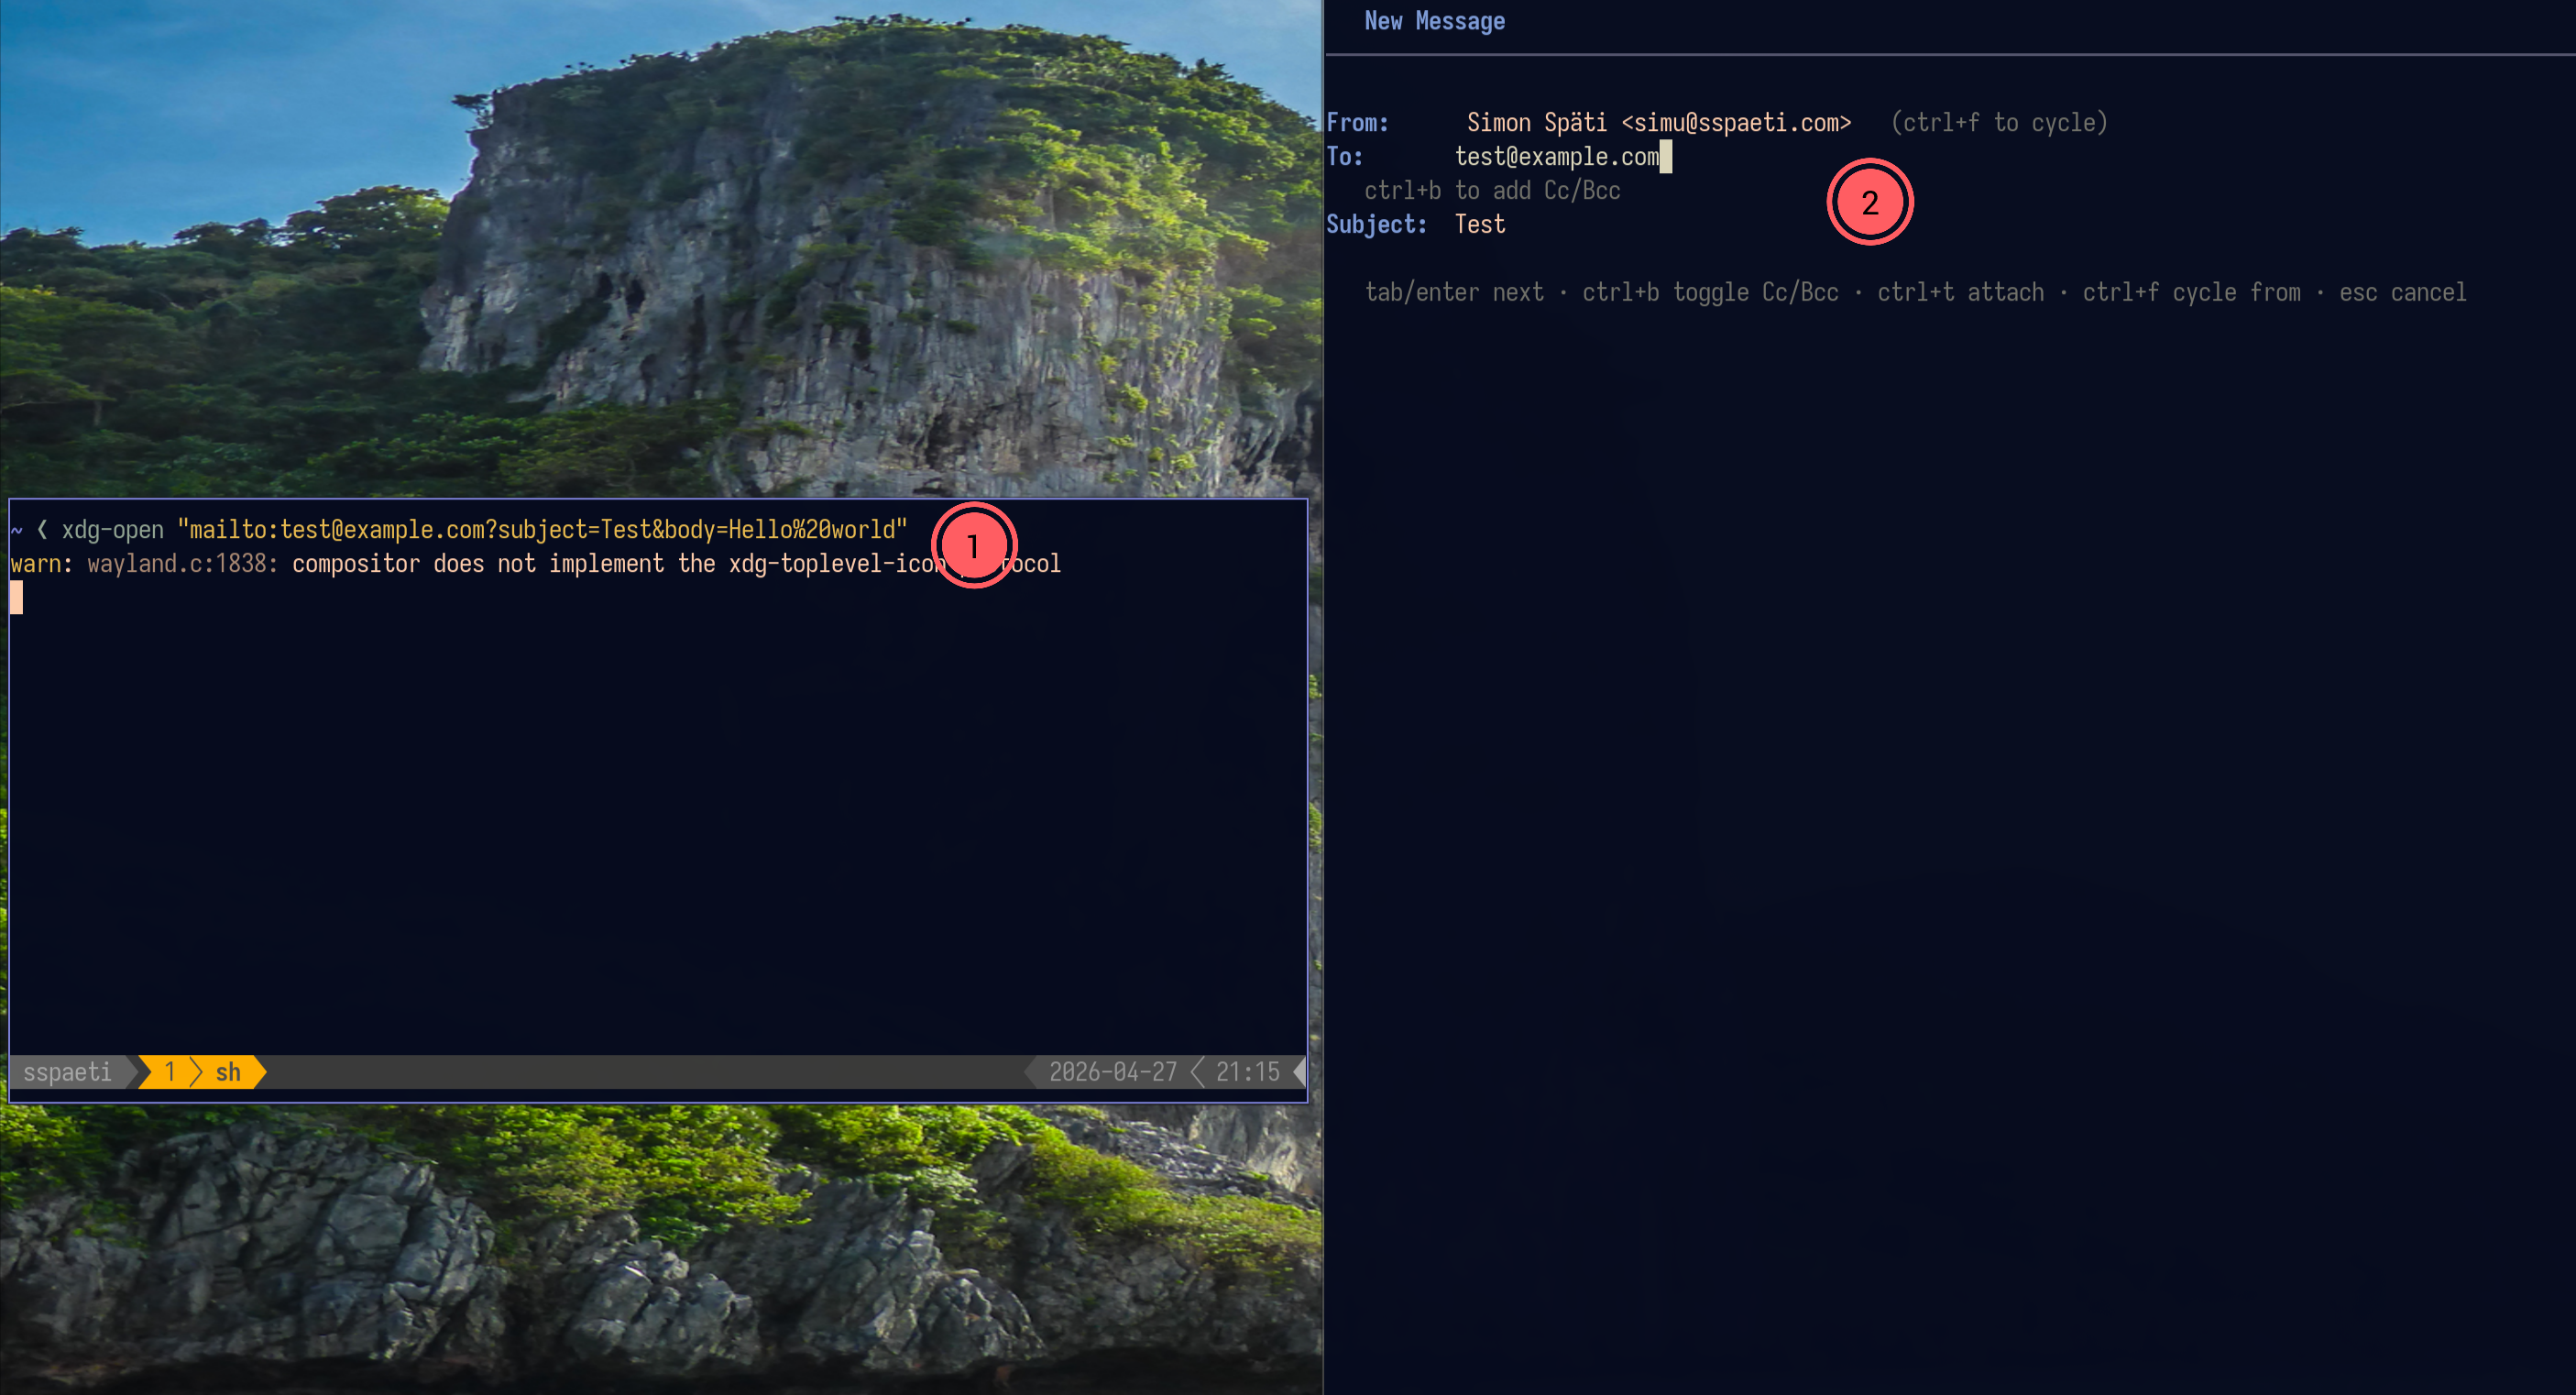
Mailto Handler
neomd can be your system’s default mailto: handler. When you click a mailto: link in a browser, neomd opens in a terminal with the compose form pre-filled.
Setup on Linux:
# Register neomd as the default mailto handler
xdg-mime default neomd-mailto.desktop x-scheme-handler/mailto
The .desktop file at ~/.local/share/applications/neomd-mailto.desktop:
[Desktop Entry]
Type=Application
Name=neomd (mailto)
Comment=Compose email in neomd terminal email client
Exec=foot -e /path/to/neomd-mailto.sh %u
Icon=mail-send
Terminal=false
NoDisplay=true
MimeType=x-scheme-handler/mailto;
Replace foot with your terminal emulator (alacritty, kitty, ghostty, etc.). See the wrapper script section below for why a wrapper is needed.
Usage:
# From the CLI (flag or positional argument)
neomd --mailto "mailto:user@example.com?subject=Hello&body=Check%20this%20out"
neomd "mailto:user@example.com?subject=Hello"

# Test the xdg handler
xdg-open "mailto:user@example.com?subject=Test&body=Hello%20world"
Supported mailto fields: to (path), cc, bcc, subject, body. neomd opens the compose form with all fields pre-filled — proceed through the normal compose flow (To → Subject → editor → pre-send → send).
Browser setup (Brave/Chrome)
Chromium-based browsers maintain their own protocol handler list that can override the system default. To use neomd for mailto links in Brave:
- Go to
brave://settings/handlers(orchrome://settings/handlersfor Chrome) - Remove any existing mailto handler (e.g.
office.hostpoint.ch,mail.google.com) - Next time you click a mailto link, Brave will show a dialog asking to open neomd
Check “Always allow” in the dialog to skip the prompt in the future.
Wrapper script
Since neomd is a TUI app, it needs a login shell to access environment variables (e.g. IMAP passwords). The .desktop file uses a wrapper script:
~/.local/bin/neomd-mailto.sh:
#!/bin/zsh
source ~/.zshrc 2>/dev/null
/home/sspaeti/.local/bin/neomd "$1" 2>/tmp/neomd-mailto.log
if [ $? -ne 0 ]; then
    echo "neomd failed. Log:"
    cat /tmp/neomd-mailto.log
    read -p "Press enter to close."
fi
Make it executable: chmod +x ~/.local/bin/neomd-mailto.sh
Then reference it in the .desktop file:
Exec=foot -e /home/sspaeti/.local/bin/neomd-mailto.sh %uReplace zsh/.zshrc with bash/.bashrc if you use bash. Replace foot with your terminal emulator.
How it looks